Get XiED(tm)!
Nightrider.com Performance Parts

Don't let the Harley heat monster ruin your riding.
Reduce  Engine Surging
Improve Throttle Response
Reduce Engine Ping


HD 2007/2008 Engines

High Heat on 2007/08 HD engines

HD 2007/08 Performance Recommendations

Cool your exhaust temperature with the Wide Band O2 upgrade for 2007/08 HD

Harley Camshaft Specification Tables

HD Twin Cam Engine Builds
TC 128 HP 95 CID
TC 100HP Street Engine

The basics of Fuel Injection explained

DEWEY'S CUSTOM
Rammer Performance Air Cleaners
TC Performance Heads 100+HP

Pro Tuning on a Shade Tree Budget


Setting Ignition Timing on your
Harley-Davidson engine

INSPECTION

Check ignition timing:

At every 5000 mile (8000 km) service interval. Check for proper RPM and ignition timing as follows:

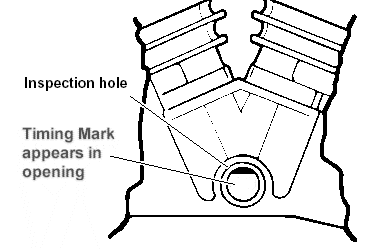
1. See Figure 0. Thread TIMING MARK VIEW PLUG (Part No. HD 96295-65D) into timing inspection hole. Be sure view plug does not touch flywheel.

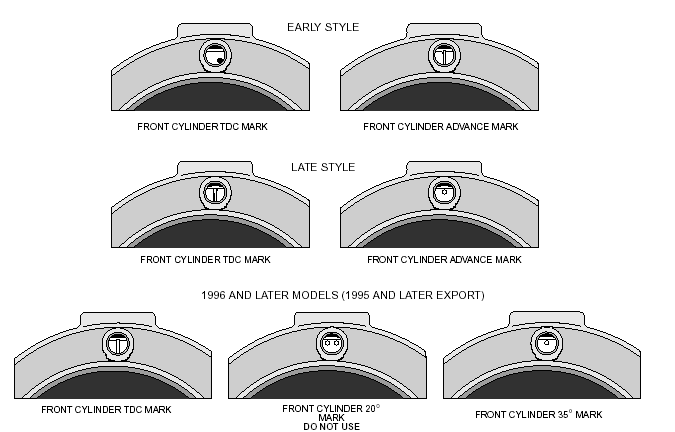
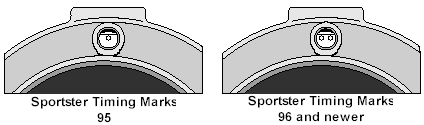
1a. See Figure 1. Locate the proper timing marks for your engine. If the shop manual is not available, remove spark plugs, turn engine until front piston is at TDC on compression stroke and identify TDC mark on the flywheel.

2. Connect leads of INDUCTIVE TIMING LIGHT to front spark plug cable, to battery positive terminal and to ground.

3. Be sure vacuum hose is properly installed at carburetor and at vacuum-operated electric switch (V.O.E.S.).

4. Start engine. Set engine speed by turning idle adjustment screw clockwise to increase speed or counterclockwise to decrease speed.

a. On world models, idle speed is 950-1050 RPM.

b. On California models, idle speed is 1150-1250 RPM.

5. Timing light will flash each time ignition spark occurs. Aim timing light into timing inspection hole. Front cylinder advance timing mark should be centered in timing inspection hole. If not, see ADJUSTMENT below.

6. Set engine slow idle speed as described in Step 4 with engine running at normal operating temperature and with enrichener control knob pushed in fully.

NOTE

Be sure the engine is warmed up to normal operating temperature and the enrichener knob is pushed all the way in before adjusting engine idle speed. Be aware that, because there are variations in individual components, it is possible for a properly warmed-up engine to idle at 2000 RPM with the enrichener knob pulled out partially.

ADJUSTMENT

1. See Figure 4. Remove outer cover pop rivets (1), outer timer cover (2), inner cover screws (3), inner cover (4) and gasket (5).

2. Loosen timer plate studs (6) just enough to allow sensor assembly (8) to be rotated using a screwdriver in the plate’s notch.

3. With timing light aimed into inspection hole, rotate sensor assembly (8) until front cylinder advance timing mark is centered in timing inspection hole.

4. Tighten timer plate studs (6).

5. Install gasket (5), inner cover (4), inner cover screws (3), timer cover (2) and new outer cover rivets (1).

6. Remove TIMING MARK VIEW PLUG from timing inspection hole. Install hex socket timing plug.

  Big Twin Sportster
Timing Range 0-35  0-45
Timing at Start 5  
Timing at adjust RPM 35  
Adjust RPM 1500 1650-1950

Figure 0
Timing Plug Location


Figure 1
Big Twin Engine TIming Marks

Early Style includes most 1980 and earlier models
Late Style includes most 1981-95 models

Figure 1a
Sportster Timing Mark

Figure 4
Ignition Timing


Home
Table of Contents
Search the site 
Nightrider COPYRIGHT

Ask us a Question

Modification, Installation, Maintenance and Tuning Index  will help you find most of the information you want on one page.

How to get Professional Tuning Results at home
Testing the Innovate Motorsport LM-1 portable air fuel meter

Profession Tuning on a Shade Tree Budget

Veypor VR2 Data Logger and Instrument Panel
Video Installation and Demo
Purchase VR2


Engine Performance
How to Build a
TC96 2007 Engines
TC88 70HP Stage1  
TC95 128HP Stage 3
TC95 100HP Street
 
TC96 2007 Stage 1/2
EVO 64 HP Stage 1
EVO 74 HP Stage 2
EVO 82 HP Stage 3
EVO 95 HP Stage 3
883 to 1200 Upgrade
Shovelhead Modifications

New EFI for EVO and TC

Performance Gallery
Horsepower Gallery
Evolution 80
Shovelhead
Sportster
Twin Cam 88/95
Evolution Unlimited
Sportster Unlimited
Drag Strip Gallery
Land Speed Racing Gallery
CV Carburetor
Modifying the CV carb
Tuning a CV carb
Camshafts
Selecting a cam
Install a TC 88/95 cam
Install a Big Twin cam
Install Sportster cams

Camshaft Specifications
Twin Cam
EVO
Shovel
XL


Exhaust Systems
EVO Exhaust Testing
TC Exhaust Testing
Khrome Werks AR100 test
Making Drag Pipes Work

SHOP TALK
Shop Manual
Carburetor
Carburetor Troubleshooting
Exhaust
Ignition
Finding Manifold Leaks
Camshafts
Cylinder Heads
Pistons and Cylinders
Clutch
Belt Drive
Shop Manual Appendix
$20 Bike Lift
Plug Wires
Spark Plugs
Engine Tuning
Nitrous Oxide
Motor Oil
Stutter Box
General Information
WEB Links
Buy Books and Manuals
Miscellaneous
Performance Calculations
Estimate Horsepower
Estimate 1/4 Mile Time
Estimate Top Speed

Engine Displacement
Exhaust Length
Gear Ratios
MPH at RPM
Air Density

The Nightrider Diaries
The ramblings of a genius a, a madman and something in between.

Where is Sifton Cams?

Autocom Active-7 tested

Harley-Davidson EFI
-EFI basics explained
-EFI modifications explained

183 HP, 2 carbs, 2680cc

Copyright 1997-2006  Stephen Mullen, Oldsmar, FL -+-