Get XiED(tm)!
Nightrider.com Performance Parts

Don't let the Harley heat monster ruin your riding.
Reduce  Engine Surging
Improve Throttle Response
Reduce Engine Ping


HD 2007/2008 Engines

High Heat on 2007/08 HD engines

HD 2007/08 Performance Recommendations

Cool your exhaust temperature with the Wide Band O2 upgrade for 2007/08 HD

Harley Camshaft Specification Tables

HD Twin Cam Engine Builds
TC 128 HP 95 CID
TC 100HP Street Engine

The basics of Fuel Injection explained

DEWEY'S CUSTOM
Rammer Performance Air Cleaners
TC Performance Heads 100+HP

Pro Tuning on a Shade Tree Budget

   
lift_picture_left1.jpg (6678 bytes)

Build a bike lift for your Harley-Davidson motorcycle for under $20

You have decided it is time to perform your own maintenance on your bike. You have even considered making a few engine modifications yourself. Maybe you'll even take the back wheel off to have a new tire installed. After a trip down to your local shop, you're back home with an arm load of parts. You grab a wrench to loosen the drain plug only to realize your going to be crawling around on the floor to do anything. It's a problem just finding the drain plug, you can forget about removing the rear tire or any other major work. What can you do about this?

lift_parts1.jpg (8191 bytes)

It's much easier to work on you bike when it is on a lift. Routine maintenance is a snap. More extensive modifications and repairs that were impossible to perform before are now possible. Removing either of the wheels is now simple. The bike is level, steady and at least one of the wheels is in the air. You can work like the pro's.

Excuse me! One little problem here. Sophisticated lifts can cost in excess of $250 and the least expensive ones are still about $80. That's a pretty good chunk of the cash you had for the work on the bike. A lot of us are not made of money, and why spend a bundle on a lift that is only going to be used a couple of times a year. Good point!

Motorcycle Performance Guide came up with a pretty simple design for a lift you can build yourself. It will take a trip to Home Depot for a few items, then about an hour to assemble. The cost to you should be less than twenty dollars.

To construct the lift you'll need the following items. Here are the estimated costs.

(1) 3 ft. long 4" x 8" Douglas fir

@ $2.00/linear foot $6.00
(1) 4' x 3/4" galv. threaded pipe @ $4.32 $4.32
(1) 3/4" galvanized pipe flange @ $3.11 $3.11
(4) 3" x 5/16" lag bolts @ .50 each $2.00
Sub-Total $15.43
Tax 1.20
Total $ 16.63

The following tools are needed to assemble the lift:

bulletPencil & Ruler
bulletElectric (not battery powered) Drill
bullet1" and 1 3/8" Paddle bore drill bit or adjustable hole saw drill attachment
bullet3/16" Wood drill bit
bullet1/2" Socket to tighten lag bolts
bulletSmall pipe wrench
bulletFor a Sportster lift:
Hand saw to notch the wood to compensate for the exhaust header on the Sporty that hangs below the frame
OR
A hammer to nail on a 1"x4" to the 4"x8"

Note: For a Sportster frame you'll need a 28" long piece of 2x4 and some long nails to secure it to the 4x8 and 2 - 1" eye bolts. More notes on a making the lift work for Sportsters is listed below.

There are other possible improvement to the lift listed below.

Instructions:

  1. Locate and mark a point on the 8" wide side of the 4"x8"x3' piece of wood that is 3 1/2" from end and on the centerline of its length.
  2. lift_detail.gif (4544 bytes)
  3. At the marked locating and using the 1 3/8" paddle bore drill bit, drill deep enough into the wood to allow the raised portion of the flange to fit into the wood and outer portion of the flange fit tightly against the wood.
    Now replace the bit with the 1" bit and continue drilling through the 4"x8". The smaller hole allow additional support of the pipe while raising and lowering the bike.
  4. Place the Pipe Flange, countersunk, into the hole and mark the four Lag Bolt hole locations on the wood.
  5. Drill each lag bolt hole with the 3/16" bit at a slight angle away from the centerline of the hole just bored through the wood. Pre-drilling the holes makes installation of the lag bolts easier and prevent the wood from splitting.
  6. Seat the flange in the 1 3/8" hole, then screw the lag bolts down securely using the socket wrench.
  7. Insert the 3/4"x4' galvanized pipe through the bored hole threading it into the flange and tighten with the pipe wrench.
lift_picture_rear1.jpg (6711 bytes)

Congratulations! Your bike lift is done. There are a few other little things you may want to do on your bike lift listed below.

To operate your lift, insert the wood directly under your frame somewhere beneath the engine. Check that you won't be putting pressure on something you shouldn't. Insure the ground beneath your bike is level. If you can with your left hand, hold your bike upright leaving the kickstand extended outward. Now push the handle of your new lift rearward and downward. Your bike is lifted and in an upright position making it easier to work on, clean and to check the oil.

Notes and Improvements:

Paint the pipe handle red. This might prevent you from accidentally falling over it.

Wrap some duct or electrical tape around the handle end of the same pipe for comfort.

Stapling or tacking down some old carpet over the lifting edges of the 4" x 8". This will keep the wood from removing paint from your frame each time you lift your bike.

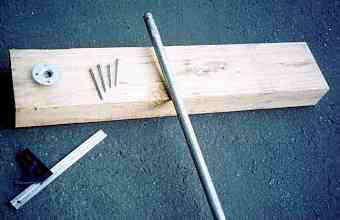
If you can not find a 4"x8", you can buy a 2"x8" 8 foot long and cut it in half. Put the two pieces together, forming a 4"x8" and nail them together. Better yet, use 2 1/2" drywall screws to fasten the two pieces of wood together.

8 inch wide lumber is actually closer to 7 1/2 inches wide. Some bikes may require a slightly higher or lower lift. You can use 2"x6" lumber for very low bikes, or add a piece of 1"x4" lumber on the top raise the bike some. With a Sportster, you can cut the 1"x4" into two pieces, leaving the required notched section for the exhaust pipe.

The pipe will not thread all the way to the bottom of the pipe flange. Don't EVEN try to thread the flange from the bottom up to save from counter sinking the flange.

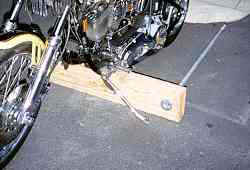
Use a 4' long 4" x 8" and put two eye bolts in the wood about 3" from each end so that they face the ceiling when the bike is on the lift.  Now when you put the bike up, take off your seat and use two nylon pull type tie downs to secure the bike frame under the seating area to the lift at the eye bolts. Straddle the bike and pull them tight simultaneously. The bike WILL be very stable. No more worries about the narrow Sporty frame or the bike's stability while up on the lift.

When drilling the holes to install the pipe and flange, use two different size bits so that the wood lends some support to the pipe and the flange doesn't take all of the weight. This improvement is listed in the assembly steps.

Notes for Sportster owners:

The Sportster front exhaust header is lower than the frame tubes. Using the lift as designed above would cause the 4"x8" lifting surface to put pressure on the exhaust header. Therefore to lift the Sportster properly you'll need to nail a 1"x4" or 2"x4" to the lifting surface of the 4"x8". It should be cut 28" long and aligned flush with the edge where you drilled the hole for the pipe.

Additionally, because the Sportster frame is so narrow, for safety and security you should purchase two 1" eye-bolts. These would be fastened to the lift so you could run a strap through them and over the seat to keep the bike from falling on either side.

Many thanks to Rikko who originally authored this article. He was kind enough to let the Motorcycle Performance Guide edit, update and publish his work. It's riders like Rickko that make the Motorcycle Performance Guide successful. THANKS!


Home
Table of Contents
Search the site 
Nightrider COPYRIGHT

Ask us a Question

Modification, Installation, Maintenance and Tuning Index  will help you find most of the information you want on one page.

How to get Professional Tuning Results at home
Testing the Innovate Motorsport LM-1 portable air fuel meter

Profession Tuning on a Shade Tree Budget

Veypor VR2 Data Logger and Instrument Panel
Video Installation and Demo
Purchase VR2


Engine Performance
How to Build a
TC96 2007 Engines
TC88 70HP Stage1  
TC95 128HP Stage 3
TC95 100HP Street
 
TC96 2007 Stage 1/2
EVO 64 HP Stage 1
EVO 74 HP Stage 2
EVO 82 HP Stage 3
EVO 95 HP Stage 3
883 to 1200 Upgrade
Shovelhead Modifications

New EFI for EVO and TC

Performance Gallery
Horsepower Gallery
Evolution 80
Shovelhead
Sportster
Twin Cam 88/95
Evolution Unlimited
Sportster Unlimited
Drag Strip Gallery
Land Speed Racing Gallery
CV Carburetor
Modifying the CV carb
Tuning a CV carb
Camshafts
Selecting a cam
Install a TC 88/95 cam
Install a Big Twin cam
Install Sportster cams

Camshaft Specifications
Twin Cam
EVO
Shovel
XL


Exhaust Systems
EVO Exhaust Testing
TC Exhaust Testing
Khrome Werks AR100 test
Making Drag Pipes Work

SHOP TALK
Shop Manual
Carburetor
Carburetor Troubleshooting
Exhaust
Ignition
Finding Manifold Leaks
Camshafts
Cylinder Heads
Pistons and Cylinders
Clutch
Belt Drive
Shop Manual Appendix
$20 Bike Lift
Plug Wires
Spark Plugs
Engine Tuning
Nitrous Oxide
Motor Oil
Stutter Box
General Information
WEB Links
Buy Books and Manuals
Miscellaneous
Performance Calculations
Estimate Horsepower
Estimate 1/4 Mile Time
Estimate Top Speed

Engine Displacement
Exhaust Length
Gear Ratios
MPH at RPM
Air Density

The Nightrider Diaries
The ramblings of a genius a, a madman and something in between.

Where is Sifton Cams?

Autocom Active-7 tested

Harley-Davidson EFI
-EFI basics explained
-EFI modifications explained

183 HP, 2 carbs, 2680cc

Copyright 1997-2006  Stephen Mullen, Oldsmar, FL -+-