Remove old cam bearing. Use a small,
inside bearing or bushing puller to remove the cam bearing. Replace the old cam bearing
with a new Torrington B-138. Do not use a late model H-D OEM
bearing with any performance camshaft.
Tricks of the trade:
The old camshaft can be used as alignment tool and press for
installation of the new bearing. Place the breather gear in place. The breather gear and
pinion gear effectively form an alignment tool so the cam bearing on the old camshaft can
be put in place with very little force required.
A few light taps on the end of the camshaft with a polyurethane or
rubber mallet may be required to make sure the cam bearing is pressed completely into the
engine case. |
Place the new cam bearing on the installation tool or on the end of
the old camshaft and install the new bearing. When installing the
Torrington bearing, remember to install it with the printed edge facing
outward.Make sure the cam bearing is pressed
completely into the engine case.
Aftermarket camshafts require a cam shim washer be placed over the
rear of the camshaft prior to installation. Using a set of dial calipers, measure length
of old cam from the front of the timing gear to the forward most area of cam bearing area.
Measure the same length of the new cam. The difference should be between .050 and .060
inches. A shim of the proper length is required. If no caliper is available to measure the
cams, install a .055 cam shim at rear of new camshaft. This is generally the correct shim
to install.
Place the proper cam shim over the rear bearing surface of the new
camshaft.
Place the thrust washer at the rear of the new camshaft.
Place a coating of assembly lubricant on the camshaft lobes,
bearing, bushing areas and camshaft gear. This will protect the camshaft and lifters
during engine startup. If assembly lube is not available, synthetic motor oil is a
suitable alternative.
Figure 8
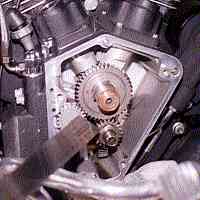 
Camshaft
Breather Gear
Pinion Gear |
Carefully place the new camshaft into the engine, making sure not to
damage the lobe or bearing surfaces. Make sure camshaft alignment mark matches with mark
on pinion gear.
Replace breather, making sure alignment marks on breather and cam
gear line up. Place nylon washer on end of breather
Install the lifter blocks using new gaskets or remove the lifter
holding tool, allowing the lifter to settle on the camshaft lobes.

Figure 10 |
The engine should look like Figure 10. The new camshaft is in place.
The lifters should be in place. It is a good time to check the work.
 | Is the thrust washer in place? |
| Is the proper shim on the camshaft? |
| Is the pinion gear and cam gear aligned properly? |
| Is the breather gear and the cam gear aligned properly? |
| Is the nylon breather gear washer in place? |
If the answer is yes to all the questions, it is time to proceed.
Replace gearcase cover gasket.
| Replacement of camshaft bushing and camshaft oil seal in nose come
should be considered if the bike is over 5 years old or has over 50,000 miles on it. |
Liberally squirt engine oil over the camshaft, cam gear, pinion gear
and breather gear prior to closing up the engine. Place a few squirts of oil over the top
of each lifter. |