Get XiED(tm)!
Nightrider.com Performance Parts

Don't let the Harley heat monster ruin your riding.
Reduce  Engine Surging
Improve Throttle Response
Reduce Engine Ping


HD 2007/2008 Engines

High Heat on 2007/08 HD engines

HD 2007/08 Performance Recommendations

Cool your exhaust temperature with the Wide Band O2 upgrade for 2007/08 HD

Harley Camshaft Specification Tables

HD Twin Cam Engine Builds
TC 128 HP 95 CID
TC 100HP Street Engine

The basics of Fuel Injection explained

DEWEY'S CUSTOM
Rammer Performance Air Cleaners
TC Performance Heads 100+HP

Pro Tuning on a Shade Tree Budget

   
Harley-Davidson

Step by Step instructions for
Installing a Camshaft in your motorcycle
Page 2

 
cam_install_02.jpg (15248 bytes)
Figure 2

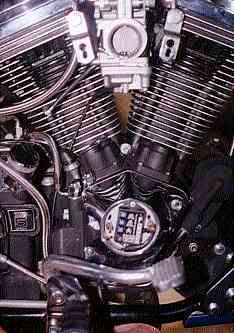
The right side of you motorcycle should be pretty much clear of any clutter. It is important that you have unrestricted access the engine. The less you have in the way while you are working in the area of the camshaft, the easier your task will be.

Loosen the pushrod tubes by removing the spring cap retainer. The spring cap retainer is the small slotted chrome cover at the top of the pushrod tube. Use a medium flat blade screw driver to pop the retainer out of place. Push the upper pushrod tube down into the lower pushrod tube. Move the shortened pushrod tubes to the top of the pushrod and hold them is place with a plastic tie wrap or with a clothespin on the pushrod. This keeps the pushrod tubes out of the way while removing the pushrods.

At this point, there are three options available to you. The type of pushrods that are currently installed or if the pushrods are going to be changed will determine your next actions.

You have stock pushrods and are going to reuse them.

For bolt-in camshafts, it is not a requirement to adjustable pushrods. The OEM pushrods will work fine. You do have to remove the rocker boxes in order to remove the pushrods. To remove the rocker boxes:

bulletDrain the gas from the fuel tank
bulletRemove the gas tank. Remember to disconnect the electrical connections for the gauges or switches located on the tank.
bulletRemove the upper rocker box covers.
bulletRemove the lower rocker box.
bulletRemove the pushrods.
bulletRemove the pushrod tubes
You have stock pushrods are are going to replace them.

This method allows the rapid removal of the pushrods, but requires that adjustable pushrods be purchased. The cost of the new pushrods can be weighed against the time it takes to remove the rocker boxes.

bulletUsing a set of bolt cutters, cut the old pushrods out. To keep particles of metal from getting into the engine, wrap shop rags around the tops of the lifter blocks, protecting the lifters.
bulletRemove the pushrod tubes.
You already have adjustable pushrods installed.
bulletLoosen the adjustable pushrods enough to allow removal of the pushrods. If the pushrods can not be adjusted short enough to remove them, you will have to remove the rocker boxes.
bulletRemove the pushrod tubes.

The right side of your engine should now look like Figure 2.


Home
Table of Contents
Search the site 
Nightrider COPYRIGHT

Ask us a Question

Modification, Installation, Maintenance and Tuning Index  will help you find most of the information you want on one page.

How to get Professional Tuning Results at home
Testing the Innovate Motorsport LM-1 portable air fuel meter

Profession Tuning on a Shade Tree Budget

Veypor VR2 Data Logger and Instrument Panel
Video Installation and Demo
Purchase VR2


Engine Performance
How to Build a
TC96 2007 Engines
TC88 70HP Stage1  
TC95 128HP Stage 3
TC95 100HP Street
 
TC96 2007 Stage 1/2
EVO 64 HP Stage 1
EVO 74 HP Stage 2
EVO 82 HP Stage 3
EVO 95 HP Stage 3
883 to 1200 Upgrade
Shovelhead Modifications

New EFI for EVO and TC

Performance Gallery
Horsepower Gallery
Evolution 80
Shovelhead
Sportster
Twin Cam 88/95
Evolution Unlimited
Sportster Unlimited
Drag Strip Gallery
Land Speed Racing Gallery
CV Carburetor
Modifying the CV carb
Tuning a CV carb
Camshafts
Selecting a cam
Install a TC 88/95 cam
Install a Big Twin cam
Install Sportster cams

Camshaft Specifications
Twin Cam
EVO
Shovel
XL


Exhaust Systems
EVO Exhaust Testing
TC Exhaust Testing
Khrome Werks AR100 test
Making Drag Pipes Work

SHOP TALK
Shop Manual
Carburetor
Carburetor Troubleshooting
Exhaust
Ignition
Finding Manifold Leaks
Camshafts
Cylinder Heads
Pistons and Cylinders
Clutch
Belt Drive
Shop Manual Appendix
$20 Bike Lift
Plug Wires
Spark Plugs
Engine Tuning
Nitrous Oxide
Motor Oil
Stutter Box
General Information
WEB Links
Buy Books and Manuals
Miscellaneous
Performance Calculations
Estimate Horsepower
Estimate 1/4 Mile Time
Estimate Top Speed

Engine Displacement
Exhaust Length
Gear Ratios
MPH at RPM
Air Density

The Nightrider Diaries
The ramblings of a genius a, a madman and something in between.

Where is Sifton Cams?

Autocom Active-7 tested

Harley-Davidson EFI
-EFI basics explained
-EFI modifications explained

183 HP, 2 carbs, 2680cc

Copyright 1997-2006  Stephen Mullen, Oldsmar, FL -+-